Saturday, December 3, 2011

Not So Fast Peanut Butter & Chocolate Fudge


I miss the baking season - When it's okay to cook lots of fattening food and swallow it down with jugs of alcohol. But with the addition of our baby boy in September (awww) I haven't had a lot of time to bake, and even less time to drink.

So when I saw a recipe that only took nine minutes to make, I couldn't pass it up. Maybe I could make some fudge and even enjoy a glass a wine before the baby wakes up!

I said maybe, didn't I?

I've been cooking long enough to know that recipes take a lot longer at home, where toddlers scream for chocolate chips and you forget to preheat the oven.

I still had to give this fudge recipe a chance. To make things fair, I got all my ingredients together before starting the clock. When it was all over, my toddler was covered in chocolate and 21 minutes had gone by. Not nine. Not even close.

Granted I took some pictures as I went along, and my toddler was chasing me around asking for more chocolate - Conditions that I'm sure were not present in the Cooking Light test kitchen. Even so, the fudge was easy to make, and I'm sure my co-workers will appreciate it when I bring it into work on Monday.

Working mom of two kids finds enough time to make fudge for her co-workers? I'll be a hero! I guess that's worth 21 minutes of my time.


Recipe from Cooking Light: Peanut Butter and Dark Chocolate Fudge
- If you don't care about the dark chocolate, regular cocoa will work fine
- I'd cut the amount of vanilla in half
- For extra peanutiness, try using all natural peanut butter. I used Jiff, and it didn't really pack a punch
- Make sure you pour the chocolates when they're hot. Once they cool down, it's a lot harder to spread
- Finally, make sure you have wax paper so you don't have to ask the significant other to stop at the store on the way home from work

Nine minutes? I think not

But it was easy - Throw it in a bowl and microwave

First layer of dark chocolate

Evil child demanding more chocolate

Second layer of peanut butter
Chill and serve

Monday, July 11, 2011

Screwing Up Roasted Tomatoes - Yes It's Possible


Roasted tomatoes are the easiest thing in the world to make - Probably as easy as toasting bread. So leave it to me to screw them up. This post should make anyone who has failed miserably in the kitchen feel a lot better about themselves.

Of course, I was able to redeem myself by making some wonderful roasted tomatoes the next day. More on that later.

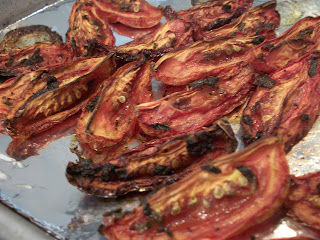
First my lousy roasted tomatoes. To make roasted tomatoes, all you need to do is cut up some tomatoes, toss them in olive oil, salt and pepper and bake them at a low temperature for several hours. So where did I go wrong? Well after the tomatoes were in the oven for about 2 1/2 hours I decided to pull them out. Sure they were still a little juicy and red, but I thought they would be just fine.

I was wrong. Instead of tasting like a rich, concentrated sun dried tomatoes, they tasted like... well, cooked tomatoes that had been tossed in olive oil, salt, and pepper.

That could have been the end of it. But, nooooo, I had to serve up my crappy cooked tomatoes. I bought some garlic toasts (another mistake) and topped them with cream cheese (and yet another mistake) and the tomatoes.

What I ended up with was a crunchy garlic toast with a super juicy warm tomato slice and some flavorless cream cheese. Not my best moment.

I knew I could do better. Hell, anyone could do better.

So the next day the oven was back on and the tomatoes were being tossed again. This time I added plenty of salt, pepper and some diced fresh oregano. I also left the tomatoes in the oven until they were shriveled and dried. I almost left them in too long because many became singed around the edges.

Instead of the crunchy garlic toast, I sliced up a fresh bagette, toasted the slices in the oven, and topped the bread with goat cheese and the diced roasted tomatoes.

This time, I hit the jackpot. They were so good we ate every last one. It's definitely something I'd serve up at a dinner party (as if I still have time to host dinner parties).

So lessons learned: If it looks like crap, don't fool yourself, it probably will taste that way too - Just throw it out and start over (or get takeout). And if you screw up, don't worry, even people who write dumb food blogs make mistakes every once in a while.

Not enough time in the oven


Just right

Sunday, July 3, 2011

Homemade Marshmallows: Easy, Cheap, and Sticky


Don't ask why I wanted to make marshmallows. Probably just to say I've done it. So on this Fourth of July weekend I made a big, beautiful batch of homemade marshmallows that will hopefully be consumed by my coworkers on Monday.

I have three ways to describe making marshmallows. Easy. Cheap. And Sticky. And yes, if you have a dirty mind you're probably giggling to yourself right now.

There are really only seven ingredients and that's if you include water. I had everything in my pantry, except for the gelatin. You'll need a stand mixer, or at the very least a hand mixer and a very patient husband/child/neighbor who will be willing to mix marshmallow creme for 10 minutes.

The recipes I saw also called for a candy thermometer, but I just winged it, cooking the sugars for about eight minutes until they turned from a cloudy white to a clear syrup. If you have a candy thermometer, then I doubt you need my advice on making homemade marshmallows.

I used a recipe from Alton Brown, and just a note, it does take about 4 hours for the marshmallows to set.

Now to the sticky part. If a recipe says to lightly oil a spatula, do it. Don't assume that drop of water on the counter is water - It's probably corn syrup. And if you've every used super glue, you know what happens when you try to use one hand to clean off the other. Same thing goes for marshmallow goo.

It's a good to have a wet paper towel on hand to quickly clean up sticky fingers, countertops, handles, etc. It took me a good 20 minutes to find the sticky spot in the floor that I kept stepping in.

After I made the marshmallows, I melted down some dark chocolate. I wanted to dip the marshmallows in the chocolate, but that quickly became too messy, so I decided to drizzle it on top. The chocolate made this desert. My husband, daughter and I ate about 10 before finally putting them away.

If you're looking to make something fun, or want to entertain the kids or impress the co-workers, homemade marshmallows are the way to go. You can add food coloring, or drizzle them with different types of chocolate. And if they come out looking like crap, then there's always the fire pit (I'm talking about Smores folks).

And maybe one day, just one day, you too will be able to tell people you've made homemade marshmallows.


Thank goodness for my trusty stand mixer. 


Marshmallows in the pan. Now we wait. 


I used a knife and a pizza cutter to slice them into squares. It's just like making bread, but instead of flour you're using powdered sugar and cornstarch. 


The kid has caught on by this point. She's not short, she's just trying to be sneaky. 


Yum. 

Tuesday, March 8, 2011

Beef and Bean Burritos

Lately, I've been craving beef and refried bean burritos, but surprisingly they're very hard to find. Been to Chipotle or Qdoba lately? The new trend is to have whole beans and rice in your burritos. I didn't want any of that - Just nice, mashed up, comforting, refried beans.

After endless complaining at work, a coworker finally tried to shut me up by sending me a recipe from The Pioneer Woman's Beef and Bean Burritos. Believe me this recipe is so easy, there's really no recipe to follow.


First, chop up a half an onion and cook it with a pound of ground beef.


When the meat is browned, pour off most of the fat and add some spices (I added 1 tsp garlic powder, 1/2 tsp oregano, 2 tsp of chili powder).  Add about a 1/3 cup of red enchilada sauce. I just bought the kind at the store that looked most authentic. Look, part of the label is in Spanish! You want the beef to be covered in sauce, but not drowning in it.


Allow the beef simmer on low. While the beef is simmering heat up a can of refried beans and add about a 1/2 cup of shredded cheese. I used a colby-jack because that's what I had in my fridge. Mix the cheese in and let it melt as the beans heat up. Now, I've eaten a lot of refried beans, and why I never thought to mix in the cheese, I'll never know. Best idea ever.


To make your burrito, warm up your flour tortillas and add a layer of beans and a layer of beef. At this point you can leave it, or add more stuff. I added some sour cream and chopped green onion. Again, stuff I just had in my fridge. Fold in the sides, roll up the burrito and put it on a plate. Once you have two burritos made, spoon some more enchilada sauce on the top, and add some more shredded cheese. Nuke for 30+ seconds until the cheese melts and sprinkle some cilantro on top. This made 7 burritos. I guarantee these are super easy and really good.

For those of you who are addicted to lists:

1 lb ground beef
1/2 white onion, chopped
2 tsp chili powder
1 tsp garlic powder
1/2 tsp oregano
1 can of red enchilada sauce (some will be used to mix with beef, some will be spooned on top of burrito)
1 can refried beans
Shredded cheese (about 1 1/2 cups depending on how many burritos you're making)
Flour tortillas
Cilantro

Saturday, February 26, 2011

Garden murderer - I swear it wasn't me!

My backyard is a mess right now - Dead plants, weeds, random gardening tools. And let's not even get started on the dog crap that's everywhere.

But I swear, it's not my fault! This winter has been terrible. I don't think people realize how hard it is to find plants that can handle 110 degrees in the summer, while also surviving freezing temperatures in the winter. For me, gardening in Las Vegas is like trying to get my toddler potty trained - Frustrating.

Right now I'm in crisis mode. I paid $3 for a six-pack of cherry tomato seedlings and planted them last week when it was 60 degrees out. This weekend it's supposed to be in the low 30's with a chance of snow. Are you kidding me?

Two of the tomato plants have already whithered away, killed by the cold wind and chilly nighttime temperatures. Of course they may have just committed suicide after seeing all the other dead plants in my backyard.

So to try and salvage my $3 tomato plant purchase, I went and bought $12 in plastic to cover my garden boxes. I like to call it a makeshift greenhouse, but it's really just some plastic sheets held down by rocks. Of course it's windy, so the thing is on the verge of collapsing at any moment. I'm guessing at least one of my poor little plants will be crushed by a rock before succumbing to the cold.


I could always just go buy some more tomato plants, but that's not the point. I want to brag about how I saved my little plants by using plastic sheets and random rocks. So, if even one of these little plants survives, I will consider it a victory. Wish me luck!

Monday, February 21, 2011

Back in the Saddle Again

It's been a while since I've touched my blog, which is a shame because I really love writing about what's going on in my life. But the past few months have been a little crazy. Here's why:

My husband had a heart attack. Don't worry, he's fine - The doctor even said it was probably a fluke (if heart attacks can be called flukes). So our diet suddenly changed to "healthy" which was completely uninspiring. You try making things without cheese.

My daughter turned two. Not like that's a surprise, but all of a sudden she's getting smart and curious, and I felt guilty spending time on the computer when she wanted to play. She also learned that if she whines enough, I'll also get off the computer. So guilt and whining equaled my blog's demise.

It was winter. And winter sucks. The end.

But now my hibernation is coming to an end. Spring is almost here and it's time to put away those grey sweat pants and fuzzy slippers. My blog has been redesigned with bright, happy colors (which I'll probably be sick of in a month) and I'm starting to enjoy cooking again.

So stay tuned for more stories from my kitchen, along with some other stuff about my crazy kid and wonderful husband. I may even do some crafts - Oh the humanity!!